지난 글에서는 i18n 자동화 도입 배경과 사용 도구 및 도구 선정 배경에 대해 살펴보았다.
2024.09.18 - [React] - i18next-react와 Google Sheets를 활용한 국제화(i18n) 자동화 도입기(1) - intro/도구 선정
이번에는 적용한 방법에 대해 소개하려고 한다.
그중 먼저 i18next를 적용한 방법을 먼저 소개하겠다.
또한, namespace를 구분할 필요가 있어서 이를 구분한 방법도 소개하도록 하겠다.
(단, 코드는 보안상 실제 코드가 아닌 주로 공식 문서의 코드를 일부 수정하여 사용하였습니다)
i18next 적용하기
먼저 i18next를 사용해서 국제화를 적용했다.
i18next의 t 함수를 사용하면, key를 통해 번역 내용을 관리할 수 있다.
// 예시
<div>{t('key')}</div>
1) 패키지 설치하기
npm install i18next react-i18next i18next-browser-languagedetector
- i18next: JavsScript용 국제화 프레임워크로 plural, context, interpolation, format 등의 다양한 기능을 제공함
- react-i18next : React/React Native를 위한 i18next 기반 국제화 프레임워크
- i18next-browser-languagedetector : i18next용 브라우저 환경 언어 감지기
2) 설정하기
2-1) i18next의 i18n을 사용하는 파일 작성 및 초기 설정하기
먼저, i18n.ts 파일을 아래와 같이 작성한다.
아래 내용은 공식문서를 바탕으로 작성했으며, 자세한 셋팅 옵션는 관련 문서를 참고바란다.
// 🗂️ src/translation/i18n.ts

import { initReactI18next } from "react-i18next";

import i18n from "i18next";
import LanguageDetector from "i18next-browser-languagedetector";

import * as en from "./locales/en-US"; // locales 폴더내에 생성
import * as ko from "./locales/ko-KR"; // locales 폴더내에 생성

const resources = {
  "ko-KR": { ...ko },
  "en-US": { ...en },
};

i18n
  .use(LanguageDetector) // 사용자 언어 감지
  .use(initReactI18next) // i18n 인스턴스를 react-i18next로 전달
  // i18next를 init
  .init({
    resources,
    fallbackLng: "en",
    debug: true,

    interpolation: {
      escapeValue: false, // not needed for react as it escapes by default
    },
  });

export default i18n;
2-2) 가장 최상위 진입점에 i18n.ts를 import 하기
React 어디서나 사용할 수 있도록 i18n.ts를 index.js등의 최상위 진입점에 import한다.
import React from 'react';
import { createRoot } from 'react-dom/client';
import './index.css';
import App from './App';

// import i18n (needs to be bundled ;))
import './translation/i18n';

const root = createRoot(document.getElementById('root'))
root.render(
  <React.StrictMode>
    <App />
  </React.StrictMode>
);
2-3) 적용하기
사용하는 곳에서 useTranlation 훅 혹은 Trans 컴포넌트를 사용해서 적용할 수 있다.
// 공식문서 예시
import { useTranslation, Trans } from 'react-i18next';

function App() {
  const { t } = useTranslation();

  return (
    <div className="App">
      <header className="App-header">
      ...
        <p>
          <Trans i18nKey="description.part1">
            Edit <code>src/App.js</code> and save to reload.
          </Trans>
        </p>
        <a
          className="App-link"
          href="https://reactjs.org"
          target="_blank"
          rel="noopener noreferrer"
        >
          {t('description.part2')}
        </a>
      </header>
    </div>
  );
}

export default App;
namespace 구분하여 i18next 적용하기
1) Namespaces 란?
i18next에서 여러 파일로 로드되는 번역을 분리할 수 있는 기능으로, 프로젝트 규모가 커져서 아래와 같은 이유들로 번역 파일을 구분하고 싶을 때 사용할 수 있다.
- 시멘틱한 이유로 구분이 필요한 경우
- 번역 파일이 커져서 모든 번역을 미리 로드하고 싶지 않은 경우
// 공식 문서 예시
i18next.init({
  ns: ['common', 'moduleA', 'moduleB'],
  defaultNS: 'moduleA'
}, (err, t) => {
  i18next.t('myKey'); // key in moduleA namespace (defined default)
  i18next.t('common:myKey'); // key in common namespace (not recommended with ns prefix when used in combination with natural language keys)
  // better use the ns option:
  i18next.t('myKey', { ns: 'common' });
});

// load additional namespaces after initialization
i18next.loadNamespaces('anotherNamespace', (err, t) => { /* ... */ });
사용하기
const { t } = useTranslation(['translation', 'common']);
// ...
<div>t('look.deep', { ns: 'common' })</div>
2) 프로젝트에서 적용한 방법
공식문서의 예시처럼 init에 ns에서 구분하지 않고, init의 resources에서 구분하는 방법을 사용했다.
(이유는 ns를 사용한 방법이 제대로 적용되지 않았기 때문인데, 그 원인을 찾고 있는 중이다)
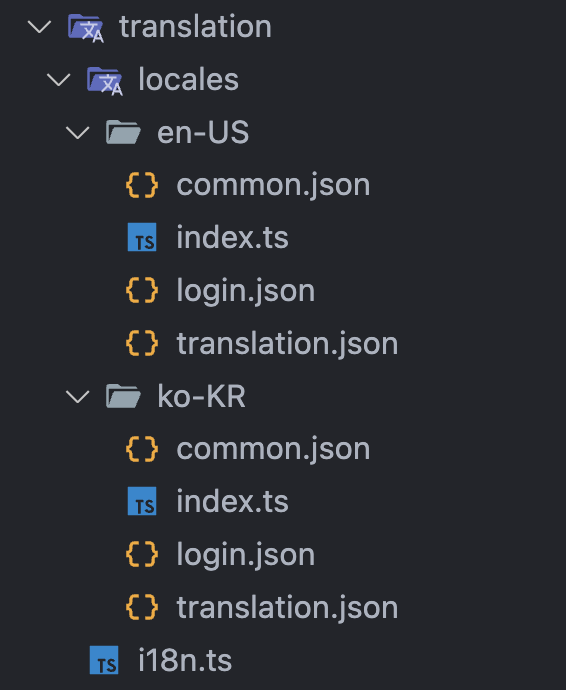
2-1) 폴더 구조
src 내부에 translation 폴더를 만들고 아래 그림과 같이 구성하였다.
2-2) 파일내 namespace 구분
하나의 파일내에서도 namespace 구분이 필요한 경우, 중첩 객체 형식으로 작성하였다.
// 🗂️ src/translation/locales/{lang}/common.json

{
  "Button": {
    "REGISTER": "Register",
    "DELETE": "Delete"
  }
}
2-3) i18n.ts의 resources에 적용하기
- 하나의 index.ts에서 모아서 export한 후 i18n.ts의 resources에 적용하였다.
// 🗂️ src/translation/locales/{lang}/index.ts

import common from "./common.json";
import login from "./login.json";

export { common, login };
// 🗂️ src/translation/i18n.ts

import * as en from "./locales/en-US";
import * as ko from "./locales/ko-KR";

const resources = {
  "ko-KR": { ...ko },
  "en-US": { ...en },
};
2-4) 사용하기
t("({namespace}:{innerNameSpace}.key"))로 사용하였다.
- 파일로만 구분한 경우
// 🗂️ src/page/Login.tsx
...
import { useTranslation } from "react-i18next";
...

function Login() {
  const { t } = useTranslation();

  return (
	// ...
    <div>{t("login:login")}</div>
    // ...
  );
}

export default Login;
- 파일내에서도 중첩 객체로 구분한 경우
// 🗂️ src/page/Example.tsx
...
import { useTranslation } from "react-i18next";
...
function Example() {
  const { t } = useTranslation();

  return (
    ...
      <button>t("common:BUTTON.REGISTER")</button>
      <button>t("common:BUTTON.DELETE")</button>
  );
}

export default Example;
자동화 방법은 다음 글에서 이어서 작성하도록 하겠다
2024.11.10 - [분류 전체보기] - i18next-react와 Google Sheets를 활용한 국제화(i18n) 자동화 도입기(3) - 자동화 적용하기 (최종)
Ref
2. i18next공식문서
'React' 카테고리의 다른 글
| 디자인 패턴을 활용한 Form 컴포넌트 리팩터링: 유연성과 재사용성 모두 확보하기(최종) (0) | 2025.02.16 |
|---|---|
| 디자인 패턴을 활용한 Form 컴포넌트 리팩터링: 유연성과 재사용성 모두 확보하기(1) (0) | 2025.01.19 |
| i18next-react와 Google Sheets를 활용한 국제화(i18n) 자동화 도입기(1) - intro/도구 선정 (4) | 2024.09.18 |
| [원티드 챌린지] 리액트 테스트와 최적화 (0) | 2023.07.26 |


댓글